Data Serialization in C


Serializing data is a way of sending a byte of data one bit at a time through a single pin of microcontroller.
There are two ways to transfer a byte of data serially :
1. Using the serial port. In using a serial port, the programmer has very limited control over the sequence of the data transfer
2. The second method of serializing data is to transfer data one bit at a time and control the sequence of data and spaces between them. In many devices such as LCD, EEPROM, and ADC ; serial data communication is common. Although there are standards of serial communication such as I2C, SPI, and CAN but not all devices support such standards.
For this reason, let's see the data serialization using the C language, How it is done in C and the respective simulation.
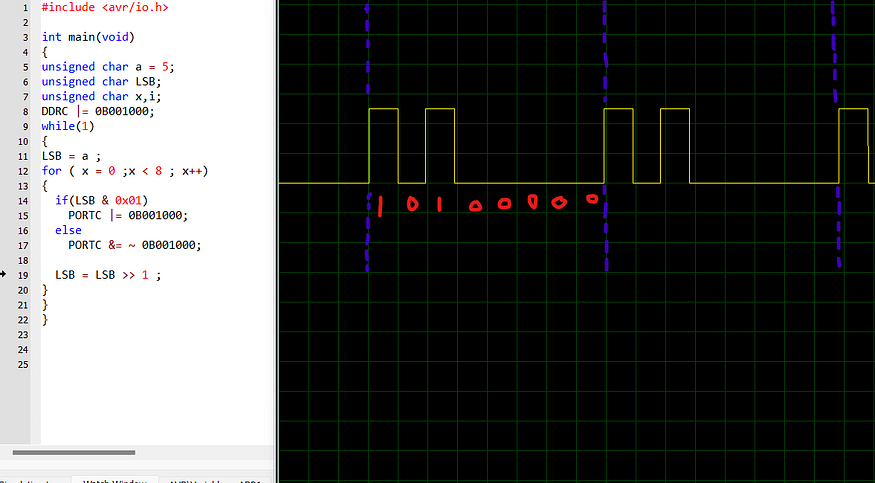
Explanation of code: The above code sends out the value of 5 serially one bit at a time via PORTC on
pin no 3 on ATMega328p, Here LSB goes first.
Line no 1 includes the library “ #include<avr/io.h>”, it enables users to include Input/Output functions and also serves access to the internal registers of the AVR microcontroller.
Line no 3 includes the main of the program in which the logic of the code resides. It serves as the entry point to the code.
Line no. 5 declares the data which we want to send serially, here in this case it is 5.
It is stored in a 1-byte long data type char and to have a full range of this data type i.e. 0- 255, we declared it as an unsigned char a = 5;
Another unsigned char variable is declared on line no 6 and line no 7 i.e. LSB and x respectively.
We will see its use further,
After that, DDRC |= 0B001000; is used to set pin no 3 on PORTC as output by setting bit 3 on data direction register pin DDRC.
In the while loop of our code, we write our main logic. on line no 11, we assigned the value of a to LSB variable.
For loop on the next line is used to iterate x up to 8 times so that all 8 bits from variable a can be seen on PORTC.3 pin serially.
Inside the for loop, we have an if condition which gets true only if the last bit on the variable is 1 and then it sets 1 on PORTC.3 pin otherwise it sets 0 on PORTC.3
Initially, on 1st iteration, we have LSB = 00000101 and it gets & with 00000001 and the result is true that is why the PORTC.3 pin is set and 1 appear across it. As you can see in the simulation high bit appears first. After that LSB is left shifted and LSB becomes 00000010.
Now on the 2nd iteration, LSB & with 00000001 which results in false that is why the else part executed and PORTC.3 pin set to low. Again LSB is shifted and LSB becomes 00000001.
Now on the 3rd iteration, LSB & with 00000001 which results in true that is why if part executed and PORTC.3 pin set to high. Again LSB is shifted and LSB becomes 00000000.
Now on the 4th to 8th iteration, the else part gets executed which sets PORTC.3 pin to zero.
If we measure the voltage across the PORTC.3 pin throughout this for loop iterations, we get voltage waveform as shown in the above figure which represents the 8-bit representation of number 5 from LSB i.e. 10100000.